
Introduction:
We, anaesthesiologists, deservedly can take pride as “airway consultants”. However, our expertise in airway management usually does not include surgical or percutaneous access to airway, which can be life saving in emergency or decrease morbidity in patients requiring long term airway management in ICU. Percutaneous Tracheostomy is a new, minimally invasive procedure which offers an easy, rapid and minimally invasive method for insertion of a tracheostomy tube compared to the conventional open surgical technique. One of the techniques of percutaneous tracheostomy is percutaneous dilation all tracheostomy (PCDT) based on the Seldinger technique to pass a specially designed guide wire and dilating forceps into the trachea, followed by dilatation of trachea. It is being increasingly used in ICU.
History:
Chevalier Jackson in 1909 described the modern technique of surgical tracheostomy.Since then it has been extensively used in intensive care patients to establish long-term or emergency access to the airways. Sheldon and colleagues in 1957 and Toye and Weinstein in 1969 described technique for percutaneous tracheostomy for the first time. The “classical” technique of PCDT using progressive dilators was introduced by Ciaglia and colleagues in 1985. Another technique, described by Griggs et al in 1990, is a one stage dilation technique using a modified Howard–Kelly forceps as a tracheal dilator.
Following is the detailed description of the technique of PCDT using Portex Percutaneous Tracheostomy set,in a ventilated patient in ICU.
Equipment Required:

Portex Percutaneous Tracheostomy Kit
1) Scalpel 2) 14G IV Cannula assembly 3) 10cc Syringe 4) Teflon Coated Guidewire with Introducer 5) Plastic Dilator 6) Guide wire Dilating Forceps (GWDF) 7) Tracheostomy tube and cannulated obturator.
Preparation of Components
- Check the tracheostomy tube cuff for leaks by test inflation. Ensure that the obturator moves freely in the tracheostomy tube. If satisfactory , fully deflate the cuff in order to avoid cuff rupture during tube insertion and clip flange wings back on to obturator
- Ensure that the guide wire moves freely through the forceps and the tracheostomy tube obturator
Preparation of the Patient:
- Consent
- Presence of another (preferably two) qualified skilled personnel who can manage the Airway/Oxygenation.
- FiO2 to 100% ( Patient is already on a ventilator )
- Increase the tidal volume
- Sedation and paralysis
- Control mode of ventilation
- Pulse oximeter , ECG and blood pressure monitoring.
- ETCO2 monitoring is desirable.
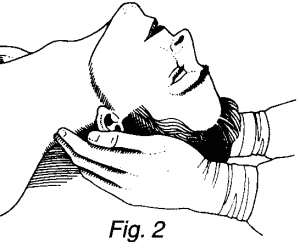
- The patient is positioned supine with a pillow under the shoulders in order to hyperextend the neck ( Fig 2 ). Care should be exercised in presence of cervical spine injury.
- Thyroid cartilage is located and stabilized between thumb and forefinger.Following anatomical landmarks are identified( Fig 3 )
- Thyroid Cartilage
- Cricoid cartilage
- Tracheal rings
- Sternal notch
- Midpoint of the line joining the cricoid cartilage and sternal notch of the extended neck marks the insertion site which corresponds to the space either between the 1st and 2nd or 2nd and 3rd tracheal rings.
- Pharynx is suctioned and tracheal tube cuff Then the tube is withdrawn up to the laryngeal inlet and cuff re inflated with latter lying entirely proximal to the vocal cords to re-establish a seal . This prevents the tube from interfering with the procedure.

- It is recommended that a fiberoptic bronchoscope is used to confirm midline placement of the guide wire and subsequent tracheostomy tube.This minimizes the risk of over shooting of the needle posteriorly which may cause esophageal injury or paratracheal placement resulting in subcutaneous emphysema and/or pneumothorax.
Preparation of the Site of surgery
- Disinfection of the skin and sterile draping
- Anatomical landmarks are located and infiltrated with 2% Lignocaine with adrenaline (decreases the skin and subcutaneous bleeding) at the proposed site of incision.
The Procedure
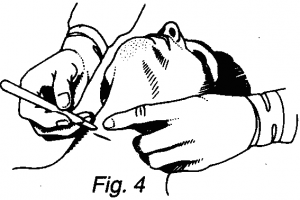
- A horizontal incision (Fig 4) is made at the insertion site, of sufficient size to accept the tracheostomy tube (1.5 – 2cm). At this stage it may be of benefit to perform an exploratory blunt dissection (keeping in midline) with an artery forceps and later feel for the tracheal rings with the finger.
- Needle and cannula assembly connected to a syringe filled with normal saline is inserted in the midline (Fig 5) in a caudal direction, to avoid the possibility of the guide wire being passed towards the pharynx subsequently.
 Next, the needle is advanced (If necessary, stepping off a tracheal ring) until free withdrawal of air into the syringe occurs which confirms the entry of the tip of the needle and cannula into the trachea.Some secretions of mucus may be aspirated during this process
- Needle and syringe are withdrawn leaving the cannula in place.Syringe is again connected to the cannula and air is aspirated to reconfirm that the cannula tip is in the trachea. Once confirmed,syringe is removed.
- Guide wire introducer is pulled out from its sheath and the ‘J’ tip is straightened leaving a sufficient length of exposed guide wire ( 2-3cm) to enable dispensing it with the forefinger and thumb ( Fig 6 )

- Guide wire introducer is attached to the cannula and it is threaded into the trachea through the cannula until at least 10cm of its lies in the trachea (Fig 7). This leaves about 30cm length of the guide wire free externally.

- Cannula is removed leaving the guide wire in place after confirming the free movement of the guide wire through the cannula.
- As the guide wire will be used to guide components into the trachea, it is important to ensure that it is not damaged or kinked during the procedure. To help avoid this, always the proximal free end of the wire is held steady with forefinger and thumb whilst advancing components into the trachea.
- In the next step, the plastic dilator is passed over the guide wire through the soft tissue, until resistance is felt on the tracheal wall. With a gentle sideways movement of the dilator (Fig. 8), the dilator is pushed forward to penetrate the anterior tracheal wall, dilating both the tissues and the tracheal wall. Confirm again the free movement of the guide wire in the trachea and dilator before removing dilator, leaving the guide wire in place.

- Once the track is created in the trachea with the plastic dilator, the pre-tracheal tissues and trachea have to be dilated. The pre-tracheal tissues are dilated by the following 3 steps:
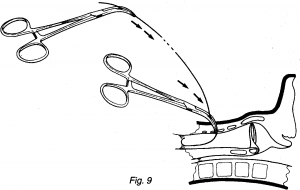
- The guide wire is threaded through the bore at the tip of the closed Guide wire Dilating Forceps (GWDF) shut which then reappears through the hole on the curved arms (Fig. 9)
- With the free end of the guide wire and forceps held at the same angle as the initial insertion, the forceps is advanced gently until resistance is felt against the anterior wall of the trachea. At this point, the jaws of the forceps lie in the pre tracheal tissue.
- Gradually the forceps is opened with both hands, dilating tissues sufficiently to accept the tracheostomy tube. Withdraw the forceps in the open position itself (Fig.10). Free movement of the guide wire in the trachea is re-confirmed.

- Repeat the previous 3 steps, keeping the forceps closed, advance the forceps through the tracheal wall (Fig. 11). Loss of resistance is felt as the tracheal wall is penetrated.

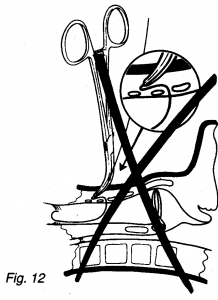
- Before proceeding to the next stage, successful entry into the tracheal lumen is confirmed to avoid guide wire If necessary, previous steps are repeated. If a loss of resistance during the penetration was not evident, a pre-tracheal false passage may have been formed (Fig. 12). Continuing the next procedure in this situation will lead to dangerous complications.
- Next,with the handles held in midline,the forceps is raised into vertical position so that the tip penetrates the tracheal wall further and lies longitudinally in the trachea (Fig. 13). Again, free movement of the guide wire in the forceps and the trachea should be confirmed.

- The forceps is now opened to dilate the tracheal wall sufficiently, to accept the tracheostomy tube (Fig. 14). WITHDRAW THE FORCEPS IN THE OPEN POSITION.

- Cuff of the tracheostomy tube is lubricated with aqueous jelly and the guide wire is threaded through the bore at the tip of the obturator.The assembly of obturator and tracheostomy tube is then advanced into the trachea (Fig.15). Obturator and guide wire are removed leaving the tracheostomy tube in place.

- Once in place,trachea is suctioned through the tracheostomy tube to establish a clear airway,because blood clots can cause airway obstruction. Breathing system is disconnected from the endotracheal tube and connected to the tracheostomy tube.
- Cuff of the tracheostomy tube is inflated.
- Successful tube placement is confirmed by inspection of the chest movement, auscultation, end tidal CO2, chest x-ray and SpO2. Secure the tracheostomy tube with the cotton tapes. Apply sterile dressing around the tube.
- Endotracheal tube is removed after cuff deflation and suctioning of the pharynx done.
Complications
Several complications have been reported and are due to faulty techniques, inadequate training or due to long term effects of tracheostomy tube itself. They include,
- False passage
- Bleeding
- Subcutaneous emphysema
- Pneumomediastinum
- Pneumothorax
- Hypoxia
- Tracheoesophageal fistula: late complication
- Tracheal stenosis: late complication
- Death
Most of these complications are preventable with meticulous techniques(most important being staying in the midline and ensuring free movement of guide wire at all the times),attention to details and careful monitoring of the patient. Presence of aberrant thyroidia ima artery is an important cause of potential,bleeding,though incidence is low.
The incidence of overall mortality with PCDT is 0.3% compared to 3.2% in surgical tracheostomy (ST). Incidence of tracheal stenosis in PCDT and ST is 3.3 and 6.6% respectively.
Contraindications
The PDT is an alternative to the conventional surgical tracheostomy. The conditions where surgical tracheostomy is preferred to the percutaneous technique are:
- Emergency airway establishment like “can’t ventilate can’t intubate” situations
- Infection at or near the intended site of the procedure
- Previous neck surgery
- Difficulty in palpating the anatomical landmarks e.g., thyroid swelling , short bull neck ,obese patient , grossly deviated trachea
- Unstable cervical spine fracture
- Malignancy at the site
- Uncontrolled coagulopathy
- Required PEEP > 15 cmH2O
- Pediatric age group – Tracheal diameter in children is smaller and the trachea more compliant as the cartilages are not well formed . Applying pressure for dilatation during the procedure would be difficult . However, a study by Toursarkissian B et al in 11 children has shown that it is safe procedure even in children.
Fiberoptic bronchoscope guided PCT
Fiberoptic bronchoscope is introduced through the endotracheal tube and trachea is visualized directly.By doing so,correct inter tracheal ring space can be chosen & can avoid breaking the tracheal rings. In addition,posterior tracheal wall injury and can be preventing by directing and confirming the proper entry of guide and subsequent dilator forceps.
Summary
- PCDT is a minimally invasive procedure for patients on long term mechanical ventilation for access to trachea,performed at bed side.
- It is an alternate to surgical tracheostomy
- There are many clinical situations where only surgical tracheostomy is preferred to PCDT. Emergency airway management is an example.
- There are other techniques of per cutaneous techniques also.
- Placement of guide wire is the initial step and it should be in proper position.
- PCDT is based on Seldinger’s technique.
- Incidence of complications is low compared to surgical tracheostomy when performed properly with attention to details
- Use of a Fiberoptic bronchoscope helps improve the safety of PCDT by guiding the entry of the needle and guide wire.
References:
- Friedman Y – Chest 1996;110:480–485
- The History OF Tracheostomy . Br. J. Anaesth. 1963; 35:388-390
- Toursarkissian B et al -Journal of pediatric surgery 1994 ;29 :1421-4
- Law R C et al , Anaesthesia 1997 , 52 :51-56
- Griggs et al – Surgery, Gynaecology and Obstetrics 1990; 170: 543-5
- Journal of Trauma 1996; 40: 238-43 , Report of 356 cases .
- Chest 1996 ; 110 : 457 – 69
- Intensive Care Medicine (1991); 17: 261- 3
Dr.Guruprasad N., D.A.,
Consultant Anaesthesiologist ,Gadag – India